23/08/2012

Engaged!......

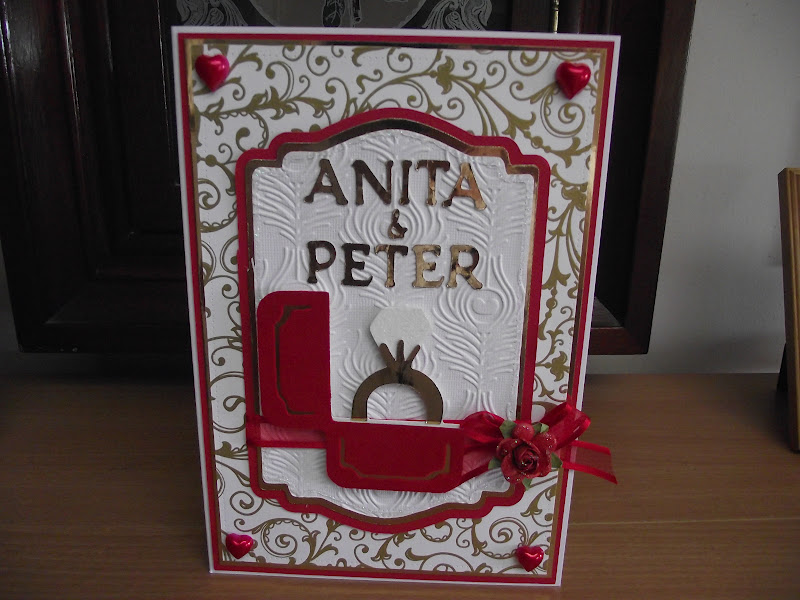
Our niece Anita texted us from the Olympic Stadium to say 'I'm engaged!' Her fiance Peter had got down on one knee and proposed! He had previously called her Dad in Australia to ask his permission. How beautifully old-fashioned and traditional is that? What a romantic Pete is! Well, since it had been a while coming I thought I'd better make them a card, and found the ideal cut, this cute ring box complete with a blingtastic ring! I cut the ring box twice, once in red cardstock and once in gold mirri (with blackout feature enabled) I passed the red cut through a Xyron machine then added red flock powder to give a velvet look to the box. The flocked portion was adhered to the mirri portion with PVA glue. The ring was cut from gold mirri and white glittercard for the diamond.
The card base is a standard C5 card, and the paper is white and gold embossed paper from my stash. The ring box was adhered to a shaped panel in the centre of the card. The panel was trimmed with narrow sheer ribbon and a rose. 'Anita & Peter' was cut from gold mirri and adhered flat above the ring box. Four red heart-shaped pearls complete the card.
Carts used:
Ring box- Sweethearts
Shaped panel- Lacy Labels
Anita & Peter- Lyrical Letters (jumbo font)
Thanks for dropping by!
Heather xx

20/08/2012

The Big Day.....

Hi everyone! As promised I'm back with the card that I made for Dan & Sarah. I intended it to be a keepsake so I bought a box to put it in and decorated the front with swirls, irridescent flowers, butterflies and a 'Big Day' die-cut. A sheer bow across one corner finishes it off nicely.


The card base is an A4 gatefold made from two A4 cards adhered together then creased to form the gatefold. The papers used are double sided pearlised papers from the Bella! Wedding 'Beloved' range.
The paper was matted to fit the fronts, inside fronts and back onto silver mirri. A smaller panel was cut to fit the front. The fabulous medallion was cut from white and pale pink pearlised card and silver mirri. I added a scalloped oval to hold the large initials and a couple of embossed butterflies. The medallion was embellished with embossed hearts, a sheer bow, Prima bloom and pearl strands. The completed medallion was adhered to the smaller panel and embellished with four embossed butterflies.
The inside fronts of the card were decorated with swirls, irridescent flowers and more butterflies.....

...and the inside back holds a pocket created from a scalloped rectangle. A tag holds a wedding greeting and the pocket, details of the wedding itself computer-generated in 60% greyscale onto vellum. The vellum piece was adhered to the pocket with glue dots, and embellished with pearls.


Because the front of the card that is hidden behind the panel when the card is closed looked a bit bare, I cut the word 'Love' from silver mirri and adhered it vertically.
And finally, because we gave a cheque as a wedding pressie I made this cute envelope from white pearlised card and decorated in the same way as the box top. I scored the cardstock on a Hougie board, punched the front edge with an MS punch then added sheer ribbon before adhering the side flaps.
Dan and Sarah loved their keepsake card!
Carts used:
Swirls/Love- Home Decor
Butterflies/scalloped oval/scalloped rectangle- Elegant Edges
Medallion and initials- Sophisticated
Oval- Opposites Attract
Tag/hearts- George
The Big Day- Phrases
All leaves were punched with an X Cut beech leaf punch
I'm off to another wedding at the weekend and I made a similar card for that one. I'll show you that one later on in the week. Thanks for hanging on in there with this picture heavy post!
Heather xxx


19/08/2012

Wedding bells!......

My nephew Daniel got married on Saturday! After two years of planning it all went off fabulously well. We had a great time! Here are my two handsome sons in their finery!

Daniel and his beautiful new wife Sarah.....

Daniel and his sister Terri who was his BestWoman (yes, there is such a thing!) She did an absolutely amazing job, and her speech at the reception, which was in the form of a poem had us all in fits!!

Terri's delightful daughters Chelsea (7) and Holli (3) were bridesmaids...

along with Sarah's cousin and best friend.

The wedding car was a New York Taxi cab (and a surprise for Dan). Dan & Sarah got engaged at the top of the Empire State Building in New York, so the wedding was New York themed. Sarah booked the cab and managed to keep it a secret all this time!

This gorgeous cake wasn't a fruit cake, but chocolate and vanilla sponge!

Our table was the Central Park table. Dan and Sarah decorated all the bowls and also individual wine glasses for the guests to take home.

Relaxing at last, the new Mr. & Mrs. Lakin

Dan and Sarah took dancing lessons so that they could impress us all with their first dance, which was, not surprisingly, 'Empire State of Mind (New York)' by Alicia Keys. They were amazing! They stayed up all night because they were being picked up at 3am this morning for their flight to their honeymoon destination of Mexico. They must have slept like logs on the 'plane!
Have a lovely life together Dan & Sarah!!!
I'll be back tomorrow with the card that I made for them.
See you later and thanks for dropping by!
Heather xxx

15/08/2012

Everything stops for tea...especially in a giant teapot!!!!!

I really like making shaped cards and they are so easy to do with the Cricut, AND you don't need a Gypsy/Craft Room/Design Studio! I cut this teapot out out 3 times- twice in card and once in patterned paper. I scored one of the white pieces across the top where the lid joins the body of the teapot then adhered the other white teapot to it above the score line. I always use wet glue when sticking the cards together as double-sided tape perishes over time. The patterned paper piece was adhered, again with wet glue, to the shaped card. The sentiment was computer-generated onto white textured cardstock, trimmed to an oval, matted onto a pink oval, then adhered to a scalloped oval. The completed sentiment oval was adhered to the centre of the teapot body with foam pads. A WOC floral arrangement and a bow completes the card.
Carts used:
Teapot- A Child's Year
Scalloped oval- Elegant Edges
Thanks for dropping by!
Heather xxx


09/08/2012

Wishing two people........

I bought a new Design Objectives embossing folder a couple of weeks ago, and although the centre of the oval is not embossed, I thought that it could be cut away and the resulting frame used to show off a sentiment, as in the wedding card above. I used pale lilac pearlised cardstock for the embossing and then cut away the centre oval around the scalloped edge. The card base was created by cutting two shapes and adhering them together down one side. Another shape the same size was cut from silver mirri and adhered to the card front, followed by a slightly smaller paper layer. The sentiment is from a wedding image font downloaded from the internet, and printed in 85% greyscale onto textured white cardstock. It was fixed behind the oval aperture with foam pads then adhered to a piece of silver mirri. White satin ribbon was threaded through a heart-shaped diamante buckle, fixed to the card, then the panel was adhered to the front of the card with foam tape. A floral arrangement consisting of WOC blooms, silk flowers and pearl stems was adhered to the bottom left hand side of the card. The doves were cut from white pearlised cardstock, embellished with a punched heart and adhered to the top of the aperture with foam pads to complete the card.
Card base- Lacy Labels (Asian cut)
Doves- Wedding Solutions
Thanks for dropping by!
Heather xxx

07/08/2012

Menai......

Our friends Mary and Imroz's eldest daughter Menai, had a birthday at the end of last month. I once again decided to use the Papermania Strictly Party paper and decoupage pack. There is, as you can see, very little Cricut generated stuff on this card, but hey ho! I was really chuffed how the card came out and it came together quickly because I'd made a few of the decoupage panels up, so all I had to do was choose the image I wanted to use. The decoupage was adhered to a central panel with a punched edge. I added some picot edged ribbon that I picked up from Michael's in Seattle for a bargain 30
cents for a 5 metre reel!
'Menai' was cut from pink glittercard and adhered below the ribbon. A small bloom, a trio of pearls and a sentiment from the pack completes the card.
Cart used:
'Menai'- Lyrical Letters
In case any of you are wondering where Menai got her name from, she was born in Wales and was named after the Menai Straits. I think it's such a pretty name and she's a very pretty girl too!
By the way folks, if you are liking what you see on my blog would you be so kind as to click on the little Google+ icon on the top right of my side bar and recommend me?
Thanks!!
Heather xxx

02/08/2012

Farewell Abigail.....

This is another commission card that I made for one of my hubby's nurses. Her friend Abigail was returning to the States after an exchange programme. I had quite an extensive list of ideas for her card but I thought that this All American Gal would fit the bill. The card base is an A4 and I went with a red, white and blue theme, using paper from a Creative Cardmaking issue and textured cardstock. The flag-bearer was cut from cardstock and adhered to the white central panel with foam pads. I added some striped ribbon and the sentiments were cut from glittercard. I finished the card with some red, white and blue pearls.
Carts used:
Flag bearer- Summer Celebrations
Sentiments- Car Decals
Thanks for dropping by!
Heather

**Just a note for ladies attending my workshops and Swarms. I'm using the new A Quilted Christmas cartridge for cards for the workshops from September. It's a beautiful cart and you can see it at CraftsULove or Cricut.com.**